Redmine 3.1をCentOS 7.1にインストールする手順
最小構成でインストールしたCentOS 7.1にRedmine 3.1をインストールする手順です。
このページに記載した手順を自動的に実行するAnsibleのplaybookを公開しています。ぜひご利用ください。インストール直後のCentOS 7でコマンド5個入力するだけでRedmineが構築できます。
https://github.com/farend/redmine-centos7-mariadb-ansible
本手順で作成される環境
本手順で作成される環境は以下のとおりです。
| ソフトウェア | バージョン |
|---|---|
| Redmine | Redmine 3.1.0 |
| OS | CentOS 7.1 |
| データベース | MariaDB 5.5.41 |
| webサーバ | Apache 2.4.6 (Railsの実行にはPassengerを使用) |
| Ruby | 2.2.2 |
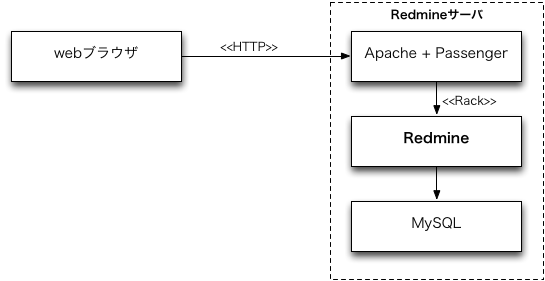
システム構成を下図に示します。

MariaDBはMySQLからフォークした、MySQLと互換性を持つデータベースです。CentOS 7ではMySQLに代わりMariaDBがパッケージに含まれるようになりました。
CentOSの設定
SELinuxを無効にする
エディタで /etc/sysconfig/selinux を開き、 SELINUX= の値を disabled に変更してください。
# This file controls the state of SELinux on the system.
# SELINUX= can take one of these three values:
#     enforcing - SELinux security policy is enforced.
#     permissive - SELinux prints warnings instead of enforcing.
#     disabled - No SELinux policy is loaded.
SELINUX=disabled
# SELINUXTYPE= can take one of three two values:
#     targeted - Targeted processes are protected,
#     minimum - Modification of targeted policy. Only selected processes are protected.
#     mls - Multi Level Security protection.
SELINUXTYPE=targeted
変更後、CentOSを再起動して下さい。
reboot
再起動後、 getenforce コマンドを実行してSELinuxが無効になったことを確認してください。 Disabled と表示されればSELinuxは無効になっています。
getenforce
Disabled
firewalldでHTTPを許可
CentOS 7.1の初期状態ではFirewalld(ファイアウォール)が有効になっており、外部からサーバ上の80/tcpポート(HTTP)に接続することができません。クライアントのwebブラウザからアクセスできるようFirewalldの設定を変更します。
デフォルトzoneにhttpを追加する:
firewall-cmd --zone=public --add-service=http --permanent
success
追加した設定を反映:
firewall-cmd --reload
success
httpでのアクセスが許可されたか確認:
firewall-cmd --zone=public --list-services
dhcpv6-client http ssh
必要なパッケージのインストール
Redmineを使用するにあたり、必要なパッケージのインストールを行います。
開発ツール(Cコンパイラ等)のインストール
yum -y groupinstall "Development Tools"
RubyとPassengerのビルドに必要なヘッダファイルなどのインストール
yum -y install openssl-devel readline-devel zlib-devel curl-devel libyaml-devel libffi-devel
MariaDBとヘッダファイルのインストール
yum -y install mariadb-server mariadb-devel
Apacheとヘッダファイルのインストール
yum -y install httpd httpd-devel
ImageMagickとヘッダファイル・日本語フォントのインストール
yum -y install ImageMagick ImageMagick-devel ipa-pgothic-fonts
ImageMagickと日本語フォントはガントチャートをPNG形式の画像にエクスポートする機能、添付ファイルのサムネイル画像を作成するのに使われます。これらのインストールを行わなくてもRedmineの実行は可能です。
Rubyのインストール
ソースコードのダウンロード
RubyのオフィシャルサイトのダウンロードページからRuby2.2の最新のソースコードをダウンロードしてください。
http://www.ruby-lang.org/ja/downloads/
curl -O https://cache.ruby-lang.org/pub/ruby/2.2/ruby-2.2.2.tar.gz
Rubyのビルド
ダウンロードしたRubyのtarballを展開し、Rubyのビルドとインストールを行ってください。
tar xvf ruby-2.2.2.tar.gz
cd ruby-2.2.2
./configure --disable-install-doc
make
make install
cd ..
configure実行時に--disable-install-doc を指定することでRubyのドキュメントのインストールを回避でき作業時間を短縮できます。
作業後、 ruby -v を実行してRubyのバージョンを表示させ、Rubyがインストールできたことを確認してください。
ruby -v
ruby 2.2.2p95 (2015-04-13 revision 50295) [x86_64-linux]
bundlerのインストール
Ruby用のパッケージ管理ツールであるbundlerをインストールします。Redmineが使用するgemパッケージをインストールするのに使用します。
gem install bundler --no-rdoc --no-ri
--no-rdoc --no-ri はドキュメントのインストールを省略するためのオプションです。
MariaDBの設定
デフォルトキャラクタセットをutf8に設定
エディタで /etc/my.cnf を開き、 [mysqld] セクションに character-set-server=utf8 を、 [mysql] セクションに default-character-set=utf8 を追加してください。
[mysqld]
datadir=/var/lib/mysql
socket=/var/lib/mysql/mysql.sock
# Disabling symbolic-links is recommended to prevent assorted security risks
symbolic-links=0
# Settings user and group are ignored when systemd is used.
# If you need to run mysqld under a different user or group,
# customize your systemd unit file for mariadb according to the
# instructions in http://fedoraproject.org/wiki/Systemd

character-set-server=utf8

[mysqld_safe]
log-error=/var/log/mariadb/mariadb.log
pid-file=/var/run/mariadb/mariadb.pid

#
# include all files from the config directory
#
!includedir /etc/my.cnf.d

[mysql]
default-character-set=utf8
MariaDBの起動および自動起動の設定
service mariadb start
systemctl enable mariadb
/etc/my.cnf への設定が反映されていることの確認
MariaDBのシステム変数 character_set_* のうち、 character_set_filesystem と character_sets_dir 以外の値がすべて utf8 になっていることを確認してください。
mysql -uroot
MariaDB [(none)]> show variables like 'character_set%';
+--------------------------+----------------------------+
| Variable_name            | Value                      |
+--------------------------+----------------------------+
| character_set_client     | utf8                       |
| character_set_connection | utf8                       |
| character_set_database   | utf8                       |
| character_set_filesystem | binary                     |
| character_set_results    | utf8                       |
| character_set_server     | utf8                       |
| character_set_system     | utf8                       |
| character_sets_dir       | /usr/share/mysql/charsets/ |
+--------------------------+----------------------------+
8 rows in set (0.00 sec)

MariaDB [(none)]> exit
rootユーザーのパスワード変更・匿名ユーザー削除ほかセキュリティ向上
MariaDBのセキュリティ向上のために、初期設定ツール mysql_secure_installation を実行してrootパスワードの設定や不要なユーザー・データベースの削除を行います。
mysql_secure_installation
/usr/bin/mysql_secure_installation: 行 379: find_mysql_client: コマンドが見つかりません

NOTE: RUNNING ALL PARTS OF THIS SCRIPT IS RECOMMENDED FOR ALL MariaDB
      SERVERS IN PRODUCTION USE!  PLEASE READ EACH STEP CAREFULLY!

In order to log into MariaDB to secure it, we'll need the current
password for the root user.  If you've just installed MariaDB, and
you haven't set the root password yet, the password will be blank,
so you should just press enter here.

Enter current password for root (enter for none):  (そのままEnterキーを押す)
OK, successfully used password, moving on...

Setting the root password ensures that nobody can log into the MariaDB
root user without the proper authorisation.

Set root password? [Y/n] y
New password: ???????? (MariaDBのrootユーザーに新たに設定するパスワードを入力)
Re-enter new password: ???????? (新パスワードを再入力)
Password updated successfully!
Reloading privilege tables..
 ... Success!


By default, a MariaDB installation has an anonymous user, allowing anyone
to log into MariaDB without having to have a user account created for
them.  This is intended only for testing, and to make the installation
go a bit smoother.  You should remove them before moving into a
production environment.

Remove anonymous users? [Y/n] y  (匿名ユーザーを削除)
 ... Success!

Normally, root should only be allowed to connect from 'localhost'.  This
ensures that someone cannot guess at the root password from the network.

Disallow root login remotely? [Y/n] y  (rootユーザーの接続元をlocalhostに限定)
 ... Success!

By default, MariaDB comes with a database named 'test' that anyone can
access.  This is also intended only for testing, and should be removed
before moving into a production environment.

Remove test database and access to it? [Y/n] y  (testデータベースを削除)
 - Dropping test database...
 ... Success!
 - Removing privileges on test database...
 ... Success!

Reloading the privilege tables will ensure that all changes made so far
will take effect immediately.

Reload privilege tables now? [Y/n] y  (権限関係の変更を直ちに適用)
 ... Success!

Cleaning up...

All done!  If you've completed all of the above steps, your MariaDB
installation should now be secure.

Thanks for using MariaDB!
MariaDBのrootユーザーに設定した新パスワードは、今後MariaDBにrootで接続してデータベースの管理操作を行うときに入力を求められます。
Redmine用データベースとユーザーの作成
mysql -uroot -p
MariaDB [(none)]> create database db_redmine default character set utf8;
MariaDB [(none)]> grant all on db_redmine.* to user_redmine@localhost identified by '********';
MariaDB [(none)]> flush privileges;
MariaDB [(none)]> exit;
※ ******** の部分は任意のパスワードを設定してください。このパスワードは後述のdatabase.ymlの設定で使用します。
Redmineのインストール
Redmineのダウンロード
svn コマンドを使ってRedmine 3.1.xの最新ソースコード一式をRedmineのデプロイ先のディレクトリにダウンロードしてください。以下の実行例では /var/lib/ 直下のディレクトリ redmine にソースコード一式をダウンロードします。
svn co http://svn.redmine.org/redmine/branches/3.1-stable /var/lib/redmine
http://www.redmine.org/projects/redmine/wiki/Download
データベースへの接続設定
Redmineからデータベースへ接続するための設定を記述したファイルを作成します。
以下の内容でRedmineのインストールディレクトリ(例: /var/lib/redmine)以下に config/database.yml を作成してください。
production:
  adapter: mysql2
  database: db_redmine
  host: localhost
  username: user_redmine
  password: "********"
  encoding: utf8
※ ******** 部分は、MariaDB上に作成したRedmineユーザーのパスワードです。
※ config/database.yml.example に設定例が記載されているので参考にしてください。
設定ファイル config/configuration.yml の作成
Redmineからメールサーバへ接続するための設定や日本語フォントファイルのパスを記述した設定ファイルを作成します。
以下の内容でRedmineのインストールディレクトリ以下に config/configuration.yml ファイルを作成してください。
production:
  email_delivery:
    delivery_method: :smtp
    smtp_settings:
      address: "localhost"
      port: 25
      domain: "example.com"

  rmagick_font_path: /usr/share/fonts/ipa-pgothic/ipagp.ttf
※ example.com の部分は、Redmineを実行するサーバのFQDNとしてください。
※ config/configuration.yml.example に設定例が記載されているので参考にしてください。
configuration.yml ではアップロードされたファイルの保管場所や、データベースの暗号化なども設定できます。詳しくは configuration.yml の設定項目 をご覧ください。
gemパッケージのインストール
Rubyのパッケージ管理ツール「bundler」を使用してRedmineが依存するgemパッケージをインストールします。Redmineのインストールディレクトリで以下のコマンドを実行してください。
bundle install --without development test --path vendor/bundle
Redmineの初期設定と初期データ登録
Redmine動作に関する初期設定と初期データの登録を行います。下記のコマンドはRedmineのインストールディレクトリで実行してください。
セッション改ざん防止用秘密鍵の作成
下記コマンドを実行してください。
bundle exec rake generate_secret_token
データベースのテーブル作成
config/database.yml で指定したデータベースにテーブルを作成します。
RAILS_ENV=production bundle exec rake db:migrate
デフォルトデータの登録
作成したテーブルにデフォルトデータのロードを行います。この操作によりトラッカー、優先度、ステータス、ロール、ワークフローなどの初期値が登録されます。
RAILS_ENV=production REDMINE_LANG=ja bundle exec rake redmine:load_default_data
参考: デフォルトデータのロード
Passengerのインストール
Apache上でRedmineなどのRailsアプリケーションの実行するために使われるPhusion Passengerをインストールします。
gem install passenger --no-rdoc --no-ri
PassengerのApache用モジュールのインストール
下記コマンドを実行してApache用のモジュールのビルドとインストールを行ってください。
passenger-install-apache2-module --auto
Apacheの設定
RedmineのCSSや画像へのアクセスを許可
Apache 2.4のデフォルト設定ではサーバ上の全ファイルへのアクセスが禁止されています。Redmineの画像・CSS・JavaScript等をブラウザで読み込むことができるよう、以下の設定を追加します。
<Directory "/var/lib/redmine/public">
  Require all granted
</Directory>
実際の設定例は後述します。
Passengerの設定を追加
Passengerの設定をApacheに追加します。
まず、 passenger-install-apache2-module --snippet を実行してPassengerを利用するためのApache用設定を表示させてください。
passenger-install-apache2-module --snippet
LoadModule passenger_module /usr/local/lib/ruby/gems/2.2.0/gems/passenger-5.0.15/buildout/apache2/mod_passenger.so
<IfModule mod_passenger.c>
  PassengerRoot /usr/local/lib/ruby/gems/2.2.0/gems/passenger-5.0.15
  PassengerDefaultRuby /usr/local/bin/ruby
</IfModule>
表示される設定内容は環境により異なります。上記実行例をそのまま転記して使用せず、必ず実際にRedmineを動かす環境で表示されたものを使用してください。
Apacheの設定ファイル例
ファイルのアクセス許可の設定とPassengerの設定の記述例です。
/etc/httpd/conf/httpd.conf に直接追加してもよいですが、管理しやすいようRedmine関係の設定は別ファイルに分離します。
以下の内容で /etc/httpd/conf.d/redmine.conf を作成してください。
# Redmineの画像ファイル・CSSファイル等へのアクセスを許可する設定。
# Apache 2.4のデフォルトではサーバ上の全ファイルへのアクセスが禁止されている。
<Directory "/var/lib/redmine/public">
  Require all granted
</Directory>

# Passengerの基本設定。
# passenger-install-apache2-module --snippet を実行して表示される設定を使用。
# 環境によって設定値が異なりますので以下の3行はそのまま転記しないでください。
#
LoadModule passenger_module /usr/local/lib/ruby/gems/2.2.0/gems/passenger-5.0.15/buildout/apache2/mod_passenger.so
<IfModule mod_passenger.c>
  PassengerRoot /usr/local/lib/ruby/gems/2.2.0/gems/passenger-5.0.15
  PassengerDefaultRuby /usr/local/bin/ruby
</IfModule>

# Passengerが追加するHTTPヘッダを削除するための設定(任意)。
#
Header always unset "X-Powered-By"
Header always unset "X-Runtime"

# 必要に応じてPassengerのチューニングのための設定を追加(任意)。
# 詳しくはPhusion Passenger users guide(http://www.modrails.com/documentation/Users%20guide%20Apache.html)参照。
PassengerMaxPoolSize 20
PassengerMaxInstancesPerApp 4
PassengerPoolIdleTime 864000
PassengerHighPerformance on
PassengerStatThrottleRate 10
PassengerSpawnMethod smart
PassengerFriendlyErrorPages off
CentOSではApache起動時に /etc/httpd/conf.d/*.conf が自動的に読み込まれます。
Apacheの起動および自動起動の設定
下記コマンドを実行し、Apacheを起動するとともにシステム起動時に自動起動されるよう設定してください。
service httpd start
systemctl enable httpd
Apache上のPassengerでRedmineを実行するための設定
Redmineを配置したディレクトリ以下のファイルを、Apacheを実行するユーザー・グループ(CentOSの場合はいずれも"apache")で読み書きできるよう、オーナーを変更します。
chown -R apache:apache /var/lib/redmine
どのような形態(URL)でRedmineを利用するかによって設定が異なります。三つのパターンを例に挙げます。
パターン1: webサーバをRedmine専用として使用
webサーバのルートディレクトリでRedmineを実行するための設定です。「http://サーバIPアドレスまたはホスト名/」でRedmineにアクセスできます。
エディタで /etc/httpd/conf/httpd.conf を開き DocumentRoot をRedmineのpublicディレクトリ(例: /var/lib/redmine/public)に変更してください。
DocumentRoot "/var/www/html"
↓
DocumentRoot "/var/lib/redmine/public"
設定変更後、Apacheを再起動してください。
service httpd configtest
service httpd restart
パターン2: サブディレクトリでRedmineを実行
URLのサブディレクトリでURLにアクセスできるように設定します。同じサーバでRedmine以外のアプリケーションを実行する場合や、複数のRedmineを実行する場合に便利な設定です。
シンボリックリンクの作成
Apacheの DocumentRoot に指定されているディレクトリ(デフォルトは /var/www/html)に、Redmineのpublicディレクトリ(例: /var/lib/redmine/public)に対するシンボリックリンクを作成します。シンボリックリンクの名称は、URLのディレクトリ名部分で使いたい名前(例:redmine)にしてください。
ln -s /var/lib/redmine/public /var/www/html/redmine
Apacheへの設定追加
前述の手順で作成したRedmine関係のApacheの設定ファイル /etc/httpd/conf.d/redmine.conf に以下の設定を追加します。
RackBaseURI /redmine
設定後、下記コマンドを実行してApacheを再起動してください。
service httpd configtest
service httpd restart
パターン3: バーチャルホストでRedmineを実行
特定のバーチャルホストでRedmineを実行する設定です。Apacheに以下の設定を追加します。
NameVirtualHost *:80

...

<VirtualHost *:80>
    ServerName www.example.jp
    DocumentRoot /var/lib/redmine/public
</VirtualHost>
設定後、下記コマンドを実行してApacheを再起動してください。
service httpd configtest
service httpd restart
インストール完了後の初期設定
インストールが完了しwebブラウザ経由でRedmineにアクセスできる状態になったら、日本語環境で使うための設定変更やユーザーの追加・プロジェクトの追加などを行います。
インストール後の初期設定手順については以下をご覧ください。
- Redmineを使い始めるための初期設定 (Redmine.JP)


